Putting the magic smoke back into my Instant Pot
21 May 2025
My Instant Pot stopped heating partway through cooking some rice for dinner. I didn’t find out the rice was an uncooked lukewarm mess until I opened the pot and the sharks children were displeased. Thankfully, noodles cook quickly so dinner was saved!
Dinner being saved is great and all, but I still want the Instant Pot to work. The basic symptoms were the control panel working, the lid sensor working, and the heating element not working at all! If I started a cooking cycle, the pot would eventually throw a noPr / “no pressure” error without getting warm. I struggled to find decent troubleshooting resources beyond YouTube videos suggesting random fixes without any real diagnostics so I spent some time learning about what the common issues were.
Skip directly to the troubleshooting steps if you’re in a hurry.
I took the pot apart enough to examine each part one by one and see what problems cropped up with that part. Searching for “instant pot doesn’t heat” without any qualifications gets you a lot of results. These resources would briefly touch on symptoms before blithely replacing some part, and I found that unsatisfying. I wanted to know what was broken and why my fix would work, and narrowing my search by the individual part had much better results!
In this case, there was a solder joint that had failed after many many thermal cycles. This Instant Pot is easily a decade old and has Seen Some Stuff™ so I’m not surprised something finally failed. I was pretty lucky because the fix didn’t require any new parts or equipment because I have a soldering iron on hand!
This whole repair could have taken less than an hour if I’d had a good troubleshooting resource to start with. This is the guide I wish I’d had and hopefully you find this helpful too!
Right to repair
The Instant Pot was very nice to work inside, with no easily-broken clips or glue in awkward places. Being able to effectively repair my devices and reduce the amount of waste generated is really important to me and I appreciate the Instant Pot design here!
I wish all my devices were this easily fixed, and I also wish they all came with better manuals (including the Instant Pot). I’m interested to see how California’s SB 244 - Right to Repair Act changes the landscape for electronics repair here.
Troubleshooting steps when your Instant Pot doesn’t heat up
⚠️ Always disconnect the power cord to avoid shocks. While it may seem obvious, it’s safest to be explicit that nothing in this guide needs the power connected.
I have an Instant Pot Duo 6 quart (model IP-DUO60 V2) and everything here is based on that. I’ve tried to collect all of the common troubleshooting steps in one place. If you have more details to add for this or another model, please email me!
This page is intended for Instant Pot electrical issues only and isn’t an exhaustive list. You should make sure there are no obvious mechanical issues, like the lid not fitting, dirty or broken gaskets, the inner shell is bent, etc. before troubleshooting further.
Tools needed
- a Philips #1 screwdriver
- an ohmmeter (likely as part of a multimeter or DVM)
- soldering equipment (for bad solder joints)
Accessing the interior of the pot
There’s a single screw on the bottom plate. Remove this screw and turn the plate to release it. Some pots may have a Torx screw instead of Philips.


Check the control panel
When you plug the Instant Pot in, it should make beeping noises and the display should turn on and the buttons should react when you touch them.

If it doesn’t work, start by reseating the connector. It’s the white eight-pin connector with red wires labeled CN101. If that doesn’t help, I’d guess the control panel itself is broken or one of the fuses blew so there’s no power.
Make sure the heater relay is working

It’s the big black box on the circuit board labeled K111. This mechanical relay is what controls the heating element. Test it by setting the pot to any mode and waiting for it to turn on. You should hear a click (the relay engaging), possibly during the last beep. You’ll hear a second click (the relay disengaging) when you turn it off. If the relay isn’t clicking, you may need to replace the relay or the whole main circuit board.
Make sure the lid switch is working

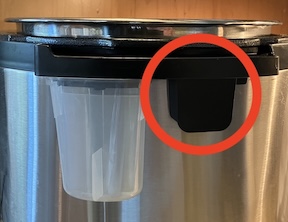
The lid switch is connected with the two black wires with a red plug labeled CN104 and is the little black box to the right of the condensation collector. The lid switch is open when the lid is off or the lid (and lid pin) is fully engaged. When the lid is on the pot but not fully sealed, the switch is closed and will show 0 ohms.
This YouTube video demonstrates how to replace the lid sensor. You’ll have to take off the rest of the cover to replace it.
Test fuses


Other people have had luck replacing one of the two fuses, one of which is on the board as an overcurrent protector and the other which is an inline thermal cutoff. The thermal cutoff seems to be the more likely culprit here. If you have to replace it more than once, that indicates there’s some deeper issue with your pot where it gets too hot to function safely.
Check the heating element

The two white roundish shapes with the pink/blue wires or the single red wire are the heating element terminals. The element itself is visible inside the pot as the base the inner pot rests on. The element has a resistance of about 15 ohms. If it’s an open circuit (i.e. infinite resistance), that means the element is broken and needs to be replaced. You’ll have to take off the rest of the cover to replace it.
Check the solder joints on the circuit board
If you’d prefer a video, this YouTube video demonstrates the problem and fix.
First, you need to pull up the main circuit board. The top side is plain uncoated PCB material and doesn’t have any solder joints. Disconnect as many wires as you can from the main board. Remove the two screws so that you can pull the board up and look at the bottom side. The bottom side has the green soldermask and traces on it.


Look for discoloration of the solder from its normal shiny silver, particularly around the thicker traces (i.e. the ones that carry more power). When testing continuity, you may have to scrape a little to expose the solder and get a good probe contact. If the joint is intermittent or open, re-solder it! Make sure there’s enough new solder to make a proper cone, not too thin and not too thick. If you’re unsure whether a joint is ok or not, resoldering it has very little risk.
Check the pot thermistor

CN103 (two white wires) is connected to the thermistor that measures the pot temperature. It’s the springy small circle in the bottom of the pot. I measured it at about 62k ohms at room temperature (at least where I live). If you put a finger on the termistor while measuring the resistance, the value will go down as the thermistor warms up.
If the thermistor doesn’t behave like you’d expect, replace it! You’ll have to take the rest of the cover off to get access to it.
Check the pressure sensor

The weird part with the four black wires is the pressure sensor.
I didn’t end up needing to check this sensor! If you know how the sensor behaves when it’s working, please email me.
Something else is wrong!
There are lots of other things that can break that I haven’t covered here. You should still try to fix it! If you have more troubleshooting steps to suggest, please email me.
Other resources
These are some helpful pages I came across during my searches.
- Repair of an “Instant Pot” Pressure Cooker had the same problem as me!
- Instant Pot 60 EPC Circuit Board Replacement - iFixit Repair Guide shows the disassembly and replacement of the main circuit board of a similar model.
- How to Repair Instant Pot® Not Working Heating - YouTube