Migrating from U2F to WebAuthn
12 Jun 2019
Update (2021-07-06): Chrome is planning on deprecating support for the FIDO U2F API by March 2022. Your old U2F keys will still work, but the API mentioned in this blog post will not. There’s never been a better time to migrate to WebAuthn! I’ve also taken the opportunity to update the example repository and support the latest stable version of the Ruby WebAuthn gem I used.
When it first launched in 2014, U2F (initially developed by Yubico and Google) was an entirely new way of doing two-factor authentication. There was nothing else that came close to matching the functionality of these “security keys” – an effectively unphishable way of authenticating users. Many people, both inside the security world and out (such as GitHub, Dropbox, Stripe, and Google), were excited to support U2F in their applications to protect their users.
Over the next several years, the industry as a whole developed a replacement standard with the learnings from U2F: WebAuthn. This new standard is completely backwards-compatible with all existing security keys. If your key worked with U2F, it’ll work with WebAuthn.
What’s this post all about?
While adding WebAuthn to an app is straightforward (and there are good resources out there), it’s trickier if you have to support your existing U2F users. This post describes the process and challenges of migrating your JavaScript and backend server code from the U2F API to the WebAuthn API. This post is intended for people who are already familiar with the U2F protocol.
If you’re not sure what a security key is, check out this page which explains the basics of what security keys do and why you might want one. Most current security keys support U2F in an application.
If you’re not familiar with the U2F protocol (perhaps you’ve inherited an app with U2F you need to modernize), that’s fine too! I recommended reading this protocol guide from Yubico to learn about the high-level protocol and this tutorial for how you might set up U2F.
I strongly recommend that everyone, even you, read through the glossary at the end of this post. There is a lot of jargon ahead, and combining technical terms from two specifications gets confusing quickly.
If you’re interested in reading about the background and some interesting technical facts about WebAuthn, read on! Otherwise, skip ahead to the section describing the migration.
How hard is migrating?
While the process isn’t particularly involved, it does require a few steps to ensure everything rolls out smoothly. It requires some modifications to server-side code for generating and verifying challenges, some modifications to front-end code to call the WebAuthn APIs, and likely a database migration. The sample code should help show which steps you’ll need to take.
In particular, the first step (moving signing / authentication to WebAuthn) has to be completely finished and tested before moving on. Once you switch security key registration to WebAuthn, you’ll no longer be able to revert to the old U2F signature verification method.
How backwards-compatible is WebAuthn?

All of your existing security keys will just work. This includes users with a mix of U2F and WebAuthn registrations thanks to careful compatibility efforts by the WebAuthn authors. On the hardware side, the low-level protocol for authenticators, CTAP1, is the same as U2F, meaning all existing U2F keys will continue to function. As mentioned above, the only real limitation is that the old U2F browser components aren’t forward-compatible with WebAuthn registrations.
What if users try to re-register an existing U2F key?
Normally, browsers take care to not re-register an existing key. The server sends a list of existing key handles, allowing the browser to query each device and determine if it’s already registered. This breaks down with legacy U2F registrations while trying to add a new security key via WebAuthn.
Both Firefox and Chrome reject the legacy appid extension during registration. This means that if you have a U2F key handle, the browser won’t be able to verify that the key is registered because it doesn’t even know what the old appid was.
While this isn’t strictly speaking a problem, it’s likely to cause confusion for users. In practice, this means a user could have one U2F registration and one WebAuthn registration for the same security key, and there’s no way for the server to distinguish this. This would need to be fixed in the WebAuthn spec and in the browser implementations by accepting the appid extension during WebAuthn registration for the purposes of detecting U2F key handles.
What about supporting U2F-only users?
There’s no good reason to continue supporting U2F once you’ve migrated to WebAuthn. Several years have passed since U2F was introduced in 2014. U2F is still only supported in Chrome, and the API implementation still uses the same JavaScript polyfill developed by Google five years ago. Firefox is implementing backwards-compatible support for U2F in its lastest version, 67, but this is explicitly intended to support existing users only.
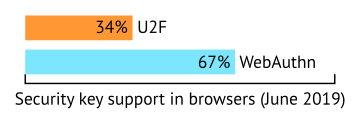
WebAuthn has been standardized and support already exists in Chrome and Firefox, including their Android versions. As of June 2019, WebAuthn has been available in both browsers for over a year. WebAuthn is also supported by Microsoft’s Edge for half a year and is currently an experimental feature in Safari for macOS. There are no recent platforms that WebAuthn doesn’t support that U2F does.
If you’re concerned about supporting users with U2F-only browsers that are at least a year old, I’d suggest convincing those users to upgrade their browsers. Phishing-resistant security keys can only do so much!
Do the new WebAuthn features like usernames matter?
They matter if you’re planning on using single-factor login with a FIDO2 key, but not if you’re just using a security key for two-factor authentication. I set these fields to placeholder values and didn’t experience any issues for the simple security key use case. While I’m glad that the WebAuthn spec is looking to the future, it’s more complicated than the original U2F APIs to implement.
What domain should be used for testing?
If you have an existing domain with a valid TLS certificate, feel free to use that! Otherwise, using localhost plus a mkcert-generated certificate is my recommendation. You cannot use 127.0.0.1 as WebAuthn explicitly only supports domains, not IP addresses or other shenanigans. U2F supported localhost testing over HTTP, but WebAuthn requires a “secure context” and thus needs a TLS certificate, even on localhost.
If you’re testing a configuration with multiple facets, you’ll have to use a domain other than localhost. I’ve used example.org for testing by making a wildcard certificate with mkcert and editing my hosts file manually to resolve foo.example.org etc. to 127.0.0.1.
Do multiple subdomains (i.e. facets) still work with WebAuthn?
Yes, with an important caveat: WebAuthn is much more permissive about which subdomains are allowed.
With U2F, you could specify an app ID URL that pointed to a list of facets. These facets limited which subdomains (and ports) you could perform a U2F registration or signing operation on. With WebAuthn, as long as the domain you’re trying to perform an operation on is a subdomain of your relying party ID (and your RP ID is a registerable domain), the operation will succeed. If you’ve been relying on facets to not let all of your subdomains use U2F, that’s no longer possible with WebAuthn.
Let’s use https://example.org/app-id.json as your old app ID, with https://example.org and https://foo.example.org:1234 as facets specified by that JSON. You can perform a U2F operation successfully on pages hosted on both of those facets, but not on https://foo.example.org:443 or https://bar.example.org. To get similar behavior in WebAuthn, you would set your relying party ID to example.org. All of the facets above (both working and formerly not-working) will function in WebAuthn. See the note under “Client extension processing” in the app ID extension spec.
Pitfalls
When building the demo, I struggled most with getting Base64 decoding and encoding correct. With plain vs URL-safe encoding, plus a lack of good built-in Base64 handling in JavaScript, choosing the right method took some thought and effort. One of the ways I made this problem easier for myself was making all the encodings consistent. Because WebAuthn uses URL-safe Base64 everywhere, I made sure all of my code, both in Ruby and in JavaScript, was using this one encoding.
It took a few tries to get a working Base64 encoding / decoding function in JavaScript. This was necessary to support the ArrayBuffers, which have to be manually (un)marshalled instead of having useful JS API support. While there are plenty of Node.js modules that claim to do this, I wanted something simple that I could just use. I tried a few of the approaches from MDN’s Base64 documentation and ended up using a small amount of JS that looks like option 3 here. Debugging various Base64 encoders and decoders was frustrating because you could successfully register a key, but then be unable to sign with it.
I suggest using a tested Base64 library, or, failing that, writing tests for your own solution. I didn’t write any tests (because I told myself it’s a simple demo app…) and look where I ended up!
How does WebAuthn backwards compatibility work?
U2F compatibility works by providing WebAuthn with the app ID originally used by U2F. This is done through the FIDO AppID extension.
navigator.credentials.get({
  publicKey: {
    "challenge": "52sapXWA...",
    "allowCredentials": [{
	"id": "AUX2T_pmV...",
	"type": "public-key"
    }],
    "extensions": {
      "appid": "https://localhost:3000"
    }
  }
});
Once a sign request is started, WebAuthn goes down the list of key handles and tries to see if they are valid. The browser tries each key handle, along with the origin, on every connected security key. If a security key responds that the key handle is incorrect, the browser will try again, but this time, send the old U2F app ID. If the key responds positively to this request, it means this key was registered with U2F!
If a key requires the U2F compatibility mode, the WebAuthn API returns this as an extension result. We pass this data back to server. If the appid extension result is present, the server uses the U2F app ID as the relying party ID, overriding the default and making verification succeed. This provides seamless backwards compatibility without having to know anything about the original registration.
It’s not all roses, though. Despite the server not needing to store whether a given registration is U2F or WebAuthn, you’ll want to do it so you can someday remove the backwards compatibility extension. I’m personally skeptical that any site with a significant number of U2F registrations will ever have them all upgraded to WebAuthn, but it’s a lot easier to record the data now than try and divine it later.
Migrating to WebAuthn
I’ve built a small demo app with Ruby on Rails. This app starts out only supporting U2F and moves through the three major migration phases. It’s available on GitHub and there are tags for each of the milestones.
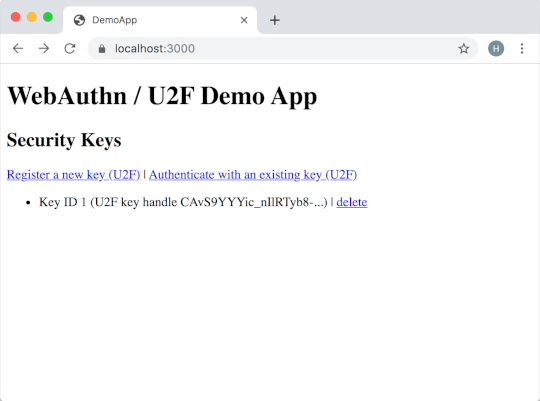
The application itself doesn’t include any fancy frameworks. It starts out with two external pieces of code: the ruby-u2f gem, used for doing U2F operations, and the Google JavaScript polyfill, known as u2f-api.js, for doing U2F in Chrome. Your app almost certainly has this polyfill lurking somewhere.
If you want to follow along, I suggest starting up the app and registering a security key! The following commands will download the app, install the dependencies, generate an HTTPS certificate, and start the app at a point where it only supports U2F:
git clone https://github.com/hansnielsen/webauthn-rails-demo.git
cd webauthn-rails-demo
bundle install
mkcert -cert-file config/tls/localhost.pem -key-file config/tls/localhost-key.pem localhost
git checkout u2f-only
rails db:migrate
rails s
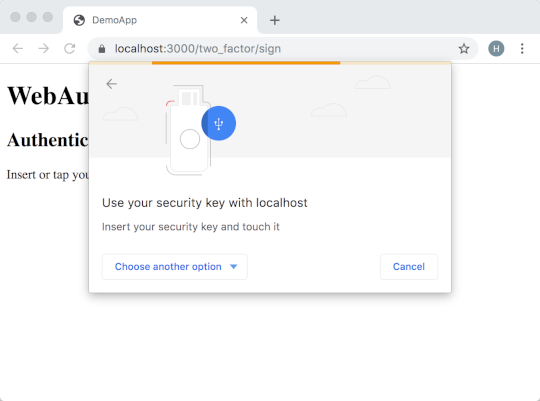
Then, open https://localhost:3000/ in Chrome (as it needs to support U2F).
Support authentication via WebAuthn
The first (and easiest) thing you’ll need to do is add a WebAuthn library. webauthn-ruby is pretty popular and works, so I use it in the demo. They’ve also published their own WebAuthn migration guide.
There are three more steps: generating the correct challenge on the backend with the WebAuthn library, handling this challenge in the frontend JavaScript, and then validating that challenge on the backend. Most of this is straight-forward translation between the U2F library and WebAuthn library you’ve chosen.
On the backend, the main change you’ll need to make (beyond what your WebAuthn library’s docs say) is setting the appid request when generating the challenge and setting the WebAuthn relying party ID correct when validating the challenge. The authentication options sent to the browser include an extensions dictionary. By setting the appid field to the AppID we used for U2F, the browser knows to try the old U2F format in addition to the new WebAuthn format for each authenticator. On the server side, we know that all responses are from U2F-registered devices, so we can set the relying party ID during verification to the U2F AppID.
On the JavaScript side, you’ll have to add some new marshalling / unmarshalling code, as there’s no great way to go from Base64 to an ArrayBuffer. The WebAuthn API itself is easier to deal with: just call navigator.credentials.get({publicKey: ...}) and you’ll get a Promise back with nicely-defined success and failure cases. We don’t have to do anything else as all of the request options were set on the server.
To try this out in the demo app, make sure you’ve stopped the running app and then run:
git checkout sign-with-webauthn
bundle install
rails s
Then, open https://localhost:3000/ in any browser that supports WebAuthn.
Migrate your database
This step is technically optional but you should probably do it anyways.
Like U2F, WebAuthn needs you to store the key handle (“credential ID” in WebAuthn), the public key of the authenticator, and the rollback counter. Those same three fields will work just fine with WebAuthn.
Strictly speaking, there’s no need to store whether a given registration is U2F or WebAuthn because of how the backwards compatibility extension works. That said, you’ll want to store the registration type anyways in the hopes that you can detect that nobody’s using U2F anymore and remove the compatibility extension. The demo app includes this in its database migration.
The demo application also has a migration because the public key format changed when I switched to registering via WebAuthn. The Ruby gem for performing U2F returned public keys as “plain” Base64 (looks like YWJj3/Wk+w==) and key handles as URL-safe Base64 (looks like YWJj3_Wk-w). The WebAuthn spec uses URL-safe Base64 for everything, and it’s a lot easier to keep the registrations in a consistent format. I could have omitted this migration but it made dealing with Base64 marshalling / unmarshalling on the server and client side much simpler.
To follow along, make sure you’ve stopped the running web application. Then, run:
git checkout db-migration
rake db:migrate
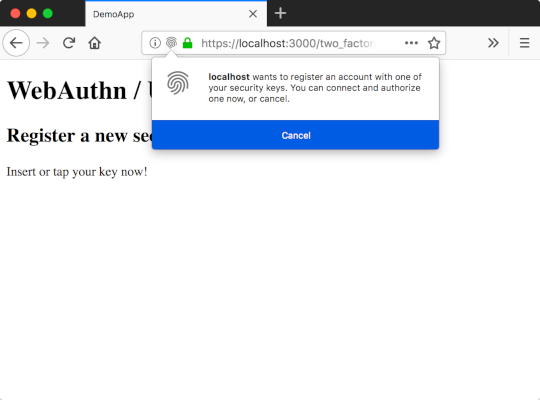
Support registration via WebAuthn
⚠️ Before migrating registration, make sure you’re comfortable with your implementation of signing via WebAuthn and that it is 100% rolled out! Any WebAuthn-originated registrations are incompatible with the old U2F library.
Making the registration changes on the server side is very similar to authenticating. Figure out the right incantations for your WebAuthn library, send them to the client, and correctly handle the response. There are no U2F compatibility changes required here.
On the JavaScript side, we switch over to using navigator.credentials.create({publicKey: ...}), which, like the authentication step, needs a bunch of marshalling and unmarshalling and returns a Promise. Nothing particularly exciting to do here since we generated the entire request body on the server.
There’s a final change that the demo app doesn’t make for the reasons called out in the database migration section, but you may want to make in your app. When a sign operation successfully completes, the getClientExtensionResults() method includes data about which WebAuthn extensions were used, including the U2F compatibility extension. By sending the extension result back to the server, we can choose the correct relying party ID (origin for WebAuthn or app ID for U2F) without having to store the authenticator type in the database.
It’s worth noting that you could add sending the extension result when you switch signing over to WebAuthn. It’s a little harder to test, though, since you don’t have any registered WebAuthn credentials yet. I found it much easier to add later in the process.
To try this out in the demo app, make sure you’ve stopped the running app and then run:
git checkout full-webauthn
rails s
Then, open https://localhost:3000/ in any browser that supports WebAuthn.
Wrapping it up
Once you turn WebAuthn registration on, you’re good to go! You’ll have to leave the appid extension (and check for extension usage) in your code until you no longer have any U2F devices (i.e. forever), but it’s unlikely that this compatibility mode will break in the forseeable future.
As for the future, maybe FIDO2 keys will get big in the next few years. Passwordless login that remembers your username and lives in a security key! I’m not sure what the migration process to support that will look like yet, but I’m sure I’ll end up implementing it when the time comes
Glossary
Many of the terms used in U2F have changed in WebAuthn. These were extremely confusing to me until I figured out what they turned into. I’ve mostly used the U2F terms in this post as I am assuming more familiarity with the existing technology.
If you see more terms you don’t recognize, try looking at the FIDO Technical Glossary or the WebAuthn spec terminology section.
The terms security key, authenticator, and device are generally used interchangeably. They mostly refer to hardware security tokens, like a YubiKey. Note that there is nothing strictly tying them to hardware, but separate hardware tokens are the best security boundary right now.
The U2F sign operation (sometimes called authentication) is the normal “tap your YubiKey to continue” step. This is known as an authentication assertion, or just assertion, in WebAuthn.
The U2F registration operation is the one-time step you take to enroll your security key at a given website. While the process is still known as registration in WebAuthn, it is often referred to as attestation because your browser returns an attestation object after you tap the key.
U2F attestation is a way of verifying that a security key was manufactured by a specific company. This process occurs during registration. It exists in WebAuthn as the attestation statement, which is an optional part of the attestation object mentioned above. This in particular was super confusing when I was trying to understand WebAuthn, so keep an eye out.
Challenge (or cryptographic challenge) means the same thing in both U2F and WebAuthn. It’s an extremely hard-to-guess random number sent by the server for the security key to sign.
The U2F AppID (or app ID) is a unique identifier for a website or other relying party, usually the URL of the website with no path. WebAuthn relies on the origin to identify a site, exactly as cross-site requests or other browser features do. The U2F specification also allowed AppIDs to be URIs like android:apk-key-hash:79fa9c0... to support apps on devices. This saw minimal use and was dropped from WebAuthn.
U2F has the concept of facets, a way to allow multiple different subdomains to share a given registration. WebAuthn simplifies the implementation and instead lets you specify a server-side relying party ID in addition to the origin. The relying party ID can be any valid “relaxation” of the origin, i.e. example.com is a valid RPID for foo.example.com and bar.example.com.
The U2F key handle is an opaque ID that you can use to identify a security key. It’s usually a long string of URL-safe Base64. In WebAuthn, it is known as the credential ID.1
The U2F hardware protocol is just, well, various U2F hardware protocols, including USB HID, NFC, and BLE. In WebAuthn, this has been superseded by the Client to Authenticator Protocol, or CTAP. CTAP1 includes the same underlying protocols as U2F, so it’s compatible with existing U2F devices. CTAP2 supports a bunch of cool new features and isn’t compatible with U2F. We’re only going to pay attention to CTAP1-level features.
The FIDO Alliance is a standards group that put together a number of standards, the most well-known of which is U2F, originally released in 2014. The FIDO2 Project is a collaboration betwen the FIDO Alliance and the W3C to develop the future of U2F. This led to standards like CTAP, an evolution of the U2F hardware protocol by the FIDO Alliance, and WebAuthn, a browser API standard created by the W3C that interacts with the lower-level CTAP protocol.
-
Interestingly, the key handle can be either a random number (if the authenticator has local data storage) or an encrypted copy of the authenticator’s private key (if the authenticator doesn’t have local data storage). This is explicitly allowed by both the U2F and WebAuthn specs. ↩︎