Changing hard-coded Chrome OS locale settings
21 Sep 2018I recently purchased a Chromebook for use as a travel laptop. I wanted something light, portable, and secure that I wouldn’t have to back up or worry about losing. I bought the Asus Chromebook Flip C302, and it’s been great! Except for one fatal flaw…
… the default locale is Canadian English.
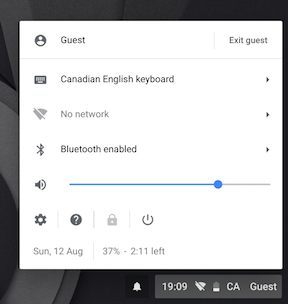

Sure, you can change this setting once you’ve logged in. If you use guest mode, though, you have to change it every time. I decided that this was Not Ok and set out to fix my beleaguered Chromebook, freeing it from the shackles of being polite.
After a pile of Google searches, some educated guesses, and some light hardware disassembly, I was able to permanently change the setting while keeping Chrome OS’s secure boot feature on. Curiosity and a desire to stick it to Canada can get you a long way!
If you’re in a big hurry to change your language settings, skip to the directions!
Where are region settings stored?

I spent a good amount of time trying to solve my problem the straightforward way. I tried changing various Chrome OS settings as a guest user and as the primary logged-in user to no avail. None of the settings I touched kept their impact after a logout or reboot. Searching around the internet for things like chromebook permanently change locale didn’t return useful results beyond the basic settings I’d already tried tweaking.
It was pretty clear to me that these settings needed to be changed at a lower level.
Finding the real setting
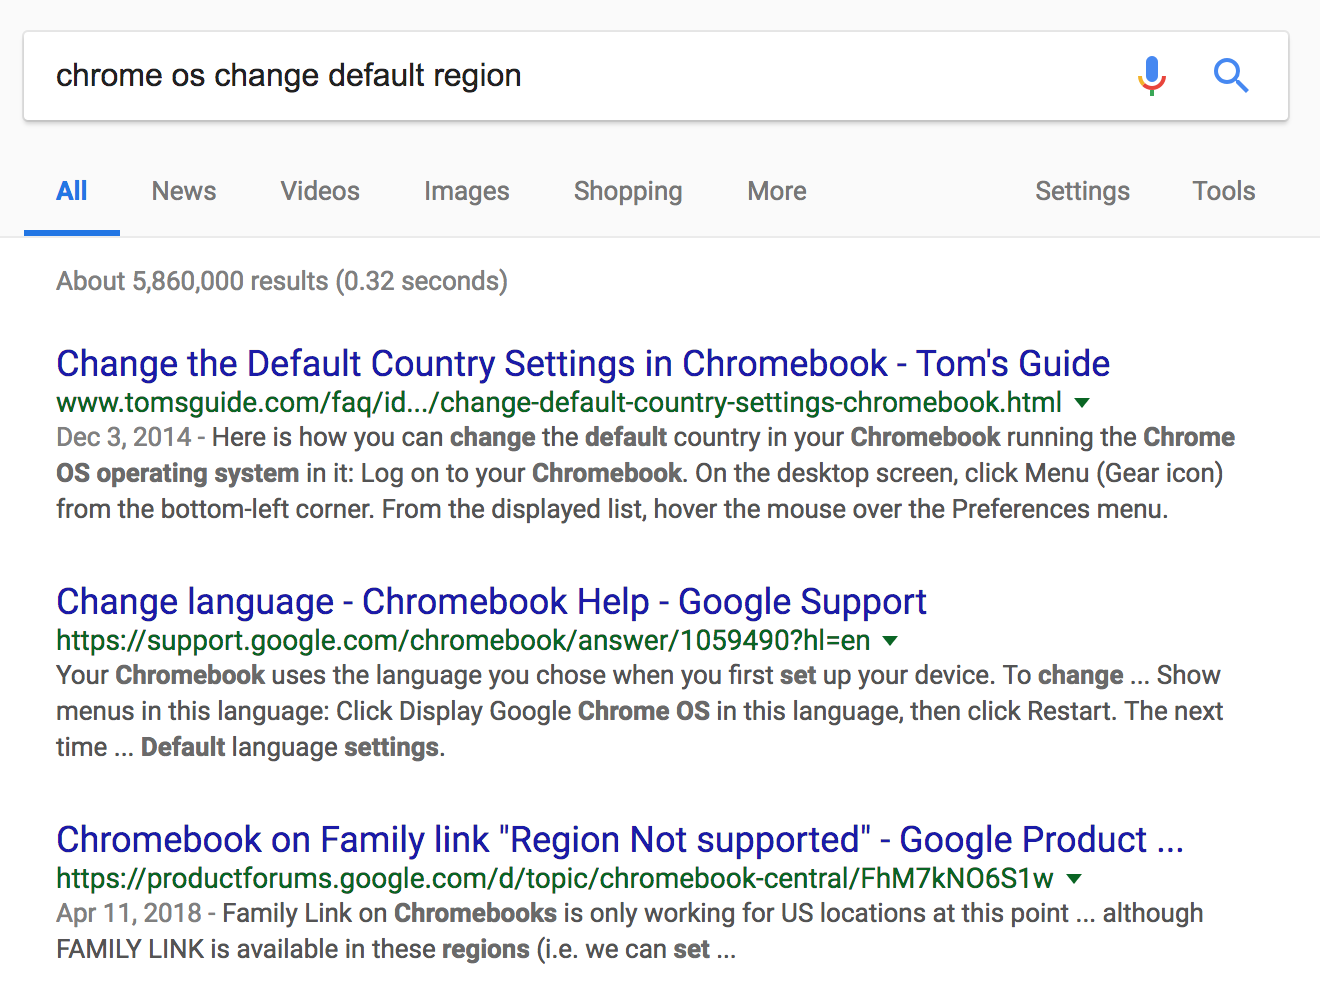
I performed a bunch of searches like chrome os change default region, adding other search terms including firmware, locale, and system. I ignored any results that looked like a standard help forum or website, instead preferring results that looked more technical. Because Chrome OS is open source, it’s likely that the setting I want is in the code, but I didn’t know where to start.
I no longer remember the original search, but I eventually stumbled across a post to the Chromium OS (the open-source part of Chrome OS) code review mailing list titled recovery: Read locale by region database. It’s likely the search results have changed by now anyways. I usually save results like these so that I can still find them after they fall out of favor with the search engines.
At this point, I wasn’t familiar with any of the internals, but whatever this change was looked like it related to region settings that would apply even in recovery mode. I followed the breadcrumbs from here to the first link for the source code commit review. The first few lines of the commit message were even more promising:
Chromebooks have a “VPD” dictionary-like area in firmware. ChromeOS keeps and reads data, including initial locale, by calling program ‘vpd’. However this becomes an issue that these data can’t be updated after device shipped, and also a maintenance issue.
This confirmed some of my suspicions, including that there was an initial configuration in firmware for the region! It also confirmed that it wasn’t easily updated after the device was shipped. It was also the first time I’d heard about VPD, which meant it was time to do more research.
Vital Product Data
I looked up vpd on Google and figured out that it probably meant “vital product data”. The Wikipedia page for it was pretty barren but corroborated it being a system-level configuration tool of some kind.
I narrowed my search to chrome os vpd. The first result was a pretty dry page in the Chromium source that has a bunch of stuff about datatypes and encodings and whatnot. While I quickly moved on to other pages, it turned out that a more careful reading of this would have revealed useful info!
The next page I looked at was somebody’s random script. The example output from dump_vpd_log had variables in it that directly referenced the system language, so it had to be on the right path.
##  sudo dump_vpd_log --full --stdout
...
##    "model_name"="Dell Chromebook 13 7310"
##    "serial_number"="8SV...."
...
##    "keyboard_layout"="xkb:us::eng"
##    "region"="us"
I suspected this script was meant to run on a Chromebook, so I gave running dump_vpd_log a shot through the default terminal (crosh). Unsurprisingly, it wasn’t present as a command, and because my Chromebook wasn’t in developer mode, I can’t run commands as root.
I put my Chromebook into developer mode and tried running dump_vpd_log --full --stdout as root again. Sure enough, it dumped out a similar list of settings, including:
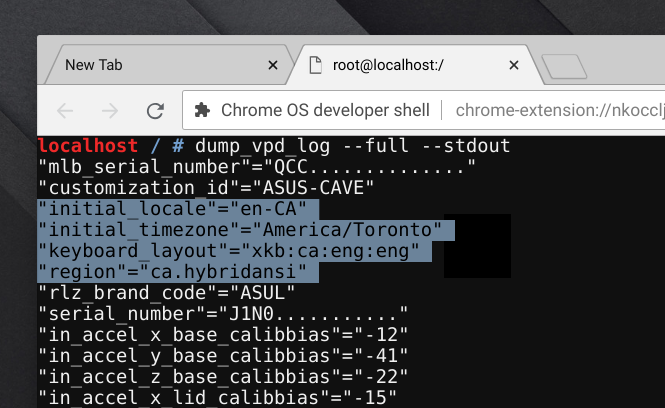
These settings reflected what I saw when I was using my Chromebook, cementing my belief that these were the correct things to change.
First try at changing VPD settings
Knowing that the VPD was almost certainly the thing I wanted to change, I went back and read the VPD page I found earlier. There’s a great part towards the bottom that lists a bunch of command examples for the vpd utility. I ran vpd -l (which should list all the values) and it matched the settings I saw earlier!
I made a backup of the ROM by running flashrom -r vpd.bin, although I will note that I didn’t have a plan to restore it in case everything broke. Then I tried to update a variable! I guessed that this would fail, as I hadn’t done anything to make the ROM writeable and also because being able to write to this from Chrome OS without hardware tweaks seems like it would be bad.
root@localhost:/home/chronos/user # flashrom -r vpd.bin
flashrom v0.9.9  : cfd7dfc : Apr 06 2018 05:12:10 UTC on Linux 3.18.0-17554-g9194949d4df2 (x86_64)
flashrom v0.9.9  : cfd7dfc : Apr 06 2018 05:12:10 UTC on Linux 3.18.0-17554-g9194949d4df2 (x86_64)
Calibrating delay loop... OK.
coreboot table found at 0x7ab80000.
WARNING: SPI Configuration Lockdown activated.
Reading flash... SUCCESS
root@localhost:/home/chronos/user # vpd -s initial_locale=en-US
flashromPartialWrite() error.
root@localhost:/home/chronos/user #
As I expected, it didn’t work. On to the next challenge!
Making the VPD writeable
I had vague memories of some hardware switch to enable writes, so back to searching the internet. chrome os write to rom brought up this page which noted that the various bits of firmware (and things that get touched by flashrom) live on an SPI ROM which is write-protected. It also notes that I can disable that via a switch or a screw. Some more searching around turned up this Reddit post about how to disable write protect on the C302. I’ve replicated the steps below.

After booting the laptop back up, I tried the vpd -s initial_locale=en-US again… and it worked! I assume, because it didn’t output anything. vpd -l now showed the new setting too. I rebooted the laptop and went through the Chrome OS setup screen. Sure enough, more of it was en-US than it was before! There were still several Canadian remnants, which makes sense since I didn’t change all of the firmware settings.
Testing out all the various settings was somewhat annoying, because it involved rebooting every time I tweaked a variable. Some of them (like keyboard_layout) were tricky to figure out. The settings I ended up with were:
"initial_locale"="en-US"
"initial_timezone"="America/Los_Angeles"
"keyboard_layout"="xkb:us::eng"
"region"="us"
My Chromebook was now fully American!

While writing this blog post, I discovered that non-region settings are now deprecated, but it looks like manufacturers (including Asus) specify them anyways. The Chrome OS regions.py file, used to generate the defaults for each region, has a set of reasonable defaults for all the different locales it supports. The comments near the top of the file (for the Region object) specifically call out the initial_locale, initial_timezone, and keyboard_layout settings as being superseded by region. I wish I had tested this while I had the write-protect screw removed, but I didn’t, and I’m too lazy to pull it apart again.
Putting it back together
There was one last question I had: would Chrome OS’s secure boot feature still work after I’d monkeyed with the VPD settings in firmware? There was only one way to find out: put the write protect screw back in, set it back to verified mode, and see if everything worked. And it did! This was pretty important to me, as I didn’t want to run an unsecured device.
This made sense – settings like region and serial number are per-device and set in the factory. It’s possible they could be tied to the hardware with a signature of some kind, but given their (relative) lack of sensitivity, it seems they’re left unchecked.
What have we learned?
Beyond proving that the locale change was possible, it showed the power of searching for information and just trying things. The original attempt only took about two hours to get working, including time spent trying random searches and clicking to the second or third page of results.
Writing up this post took an order of magnitude longer. Many of the original things I tried were just cargo-culting commands seen on websites. I ignored various options and didn’t test things that ended up being important. In particular, I didn’t spend a lot of time figuring out which settings needed to be changed in the VPD and which didn’t. There’s always more to explore!
My hope is that this post is useful to somebody, whether they just want to change the default region on their device or do other fun things with the VPD area. Particularly with open-source software, the answer may only be a short search away!
Changing your Chromebook’s locale in three easy steps*
*may be more than three steps
A warning! If you are making modifications like this to your Chromebook, you should be careful to return the device to the normal verified mode! With the write protect switch off or when you’re in developer mode, it’s trivial to bypass any protections on the device, such as your password.
Another warning! This is going to clear all of the data on your device. It’s a Chromebook, so it’s probably all backed up in the cloud, but don’t say I didn’t warn you.
Chrome OS in developer mode
Developer mode access allows you full root access to the underlying Linux system. It usually involves a “hidden” key combination, but is otherwise a built-in part of most Chrome OS devices.
My Chromebook (the Asus Chromebook Flip C302, aka cave) has no special instructions, so you can follow the generic ones provided by Google. If you have a different device, try looking it up here and seeing if that works.
For the C302, follow these steps:
- Hold down the
EscapeandRefreshkeys. - Click the power button. You can release the
EscapeandRefreshkeys at this point. - Once you see the Recovery screen, hit
Ctrl-D. - Wait a while. The Chromebook will beep at you once or twice.
- Eventually, it’ll boot back up to the normal Chrome OS login screen.
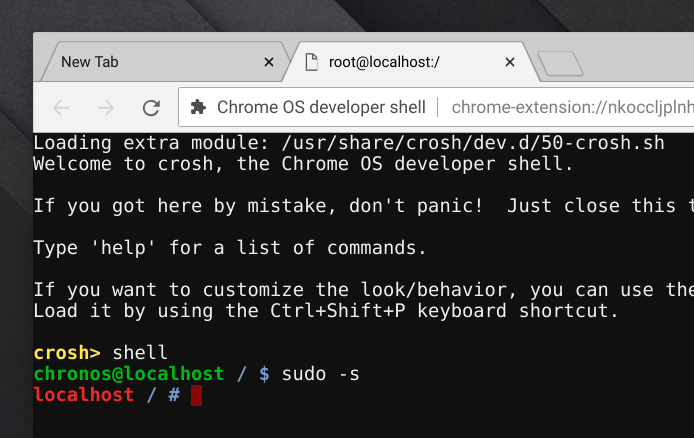
- Hit
Ctrl-Alt-F2(F2 is the right-facing arrow next to the refresh key) to get to a login prompt. - Log in with the user
chronos, and thensudo -sto get a root shell.
As an alternative to steps 6 and 7, you can:
- Go through the first setup screen and select “Browse as Guest” as soon as possible.
- Make sure a Chrome browser is open.
- Hit
Ctrl-Alt-Tto opencrosh. - Run
shellto get a real shell and thensudo -sto get a root shell.
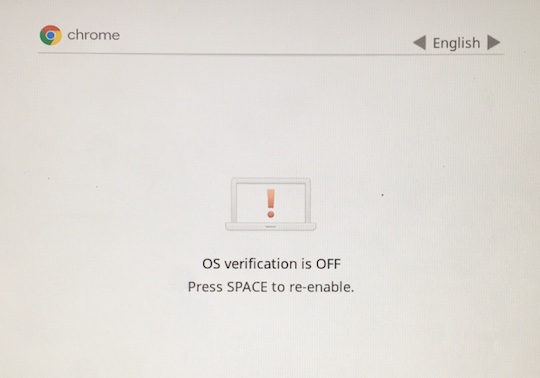
To get out of developer mode, turn the Chromebook off and then on again. It’ll say “OS verification is OFF” and “Press SPACE to re-enable”. Unsurprisingly, hit space, and your Chromebook will be reset to as good as new (assuming you haven’t modified the underlying OS install at all)! If you have, maybe try these steps to fix it.
Enabling EC firmware writes
From the beginning, Chromebooks have provided some sort of mechanism to alter the internals and play around. Beyond just developer mode, there’s also a way to allow writes to the embedded controller firmware. Because allowing flash ROM writes bypasses most of the internal secure boot controls, Google specifically designed it to be an annoying process to perform. The most common mechanism is a conductive metal screw that bridges two traces as a physical “on” switch. This is what shipped in the original Chromebook, and it’s also what ships in the C302.
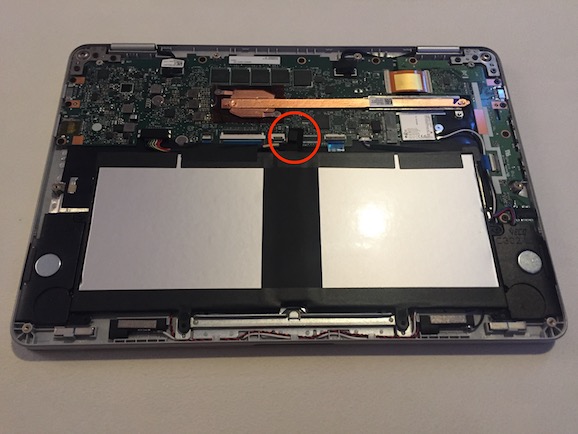
The C302’s screw is located on the motherboard, hidden under a piece of fabric tape. Since we want to get write access to the EC firmware, we’re going to remove this screw. If you’re following along and you don’t have a C302, you can probably find documentation for your specific device elsewhere; the concept is the same.
-
Open the case.
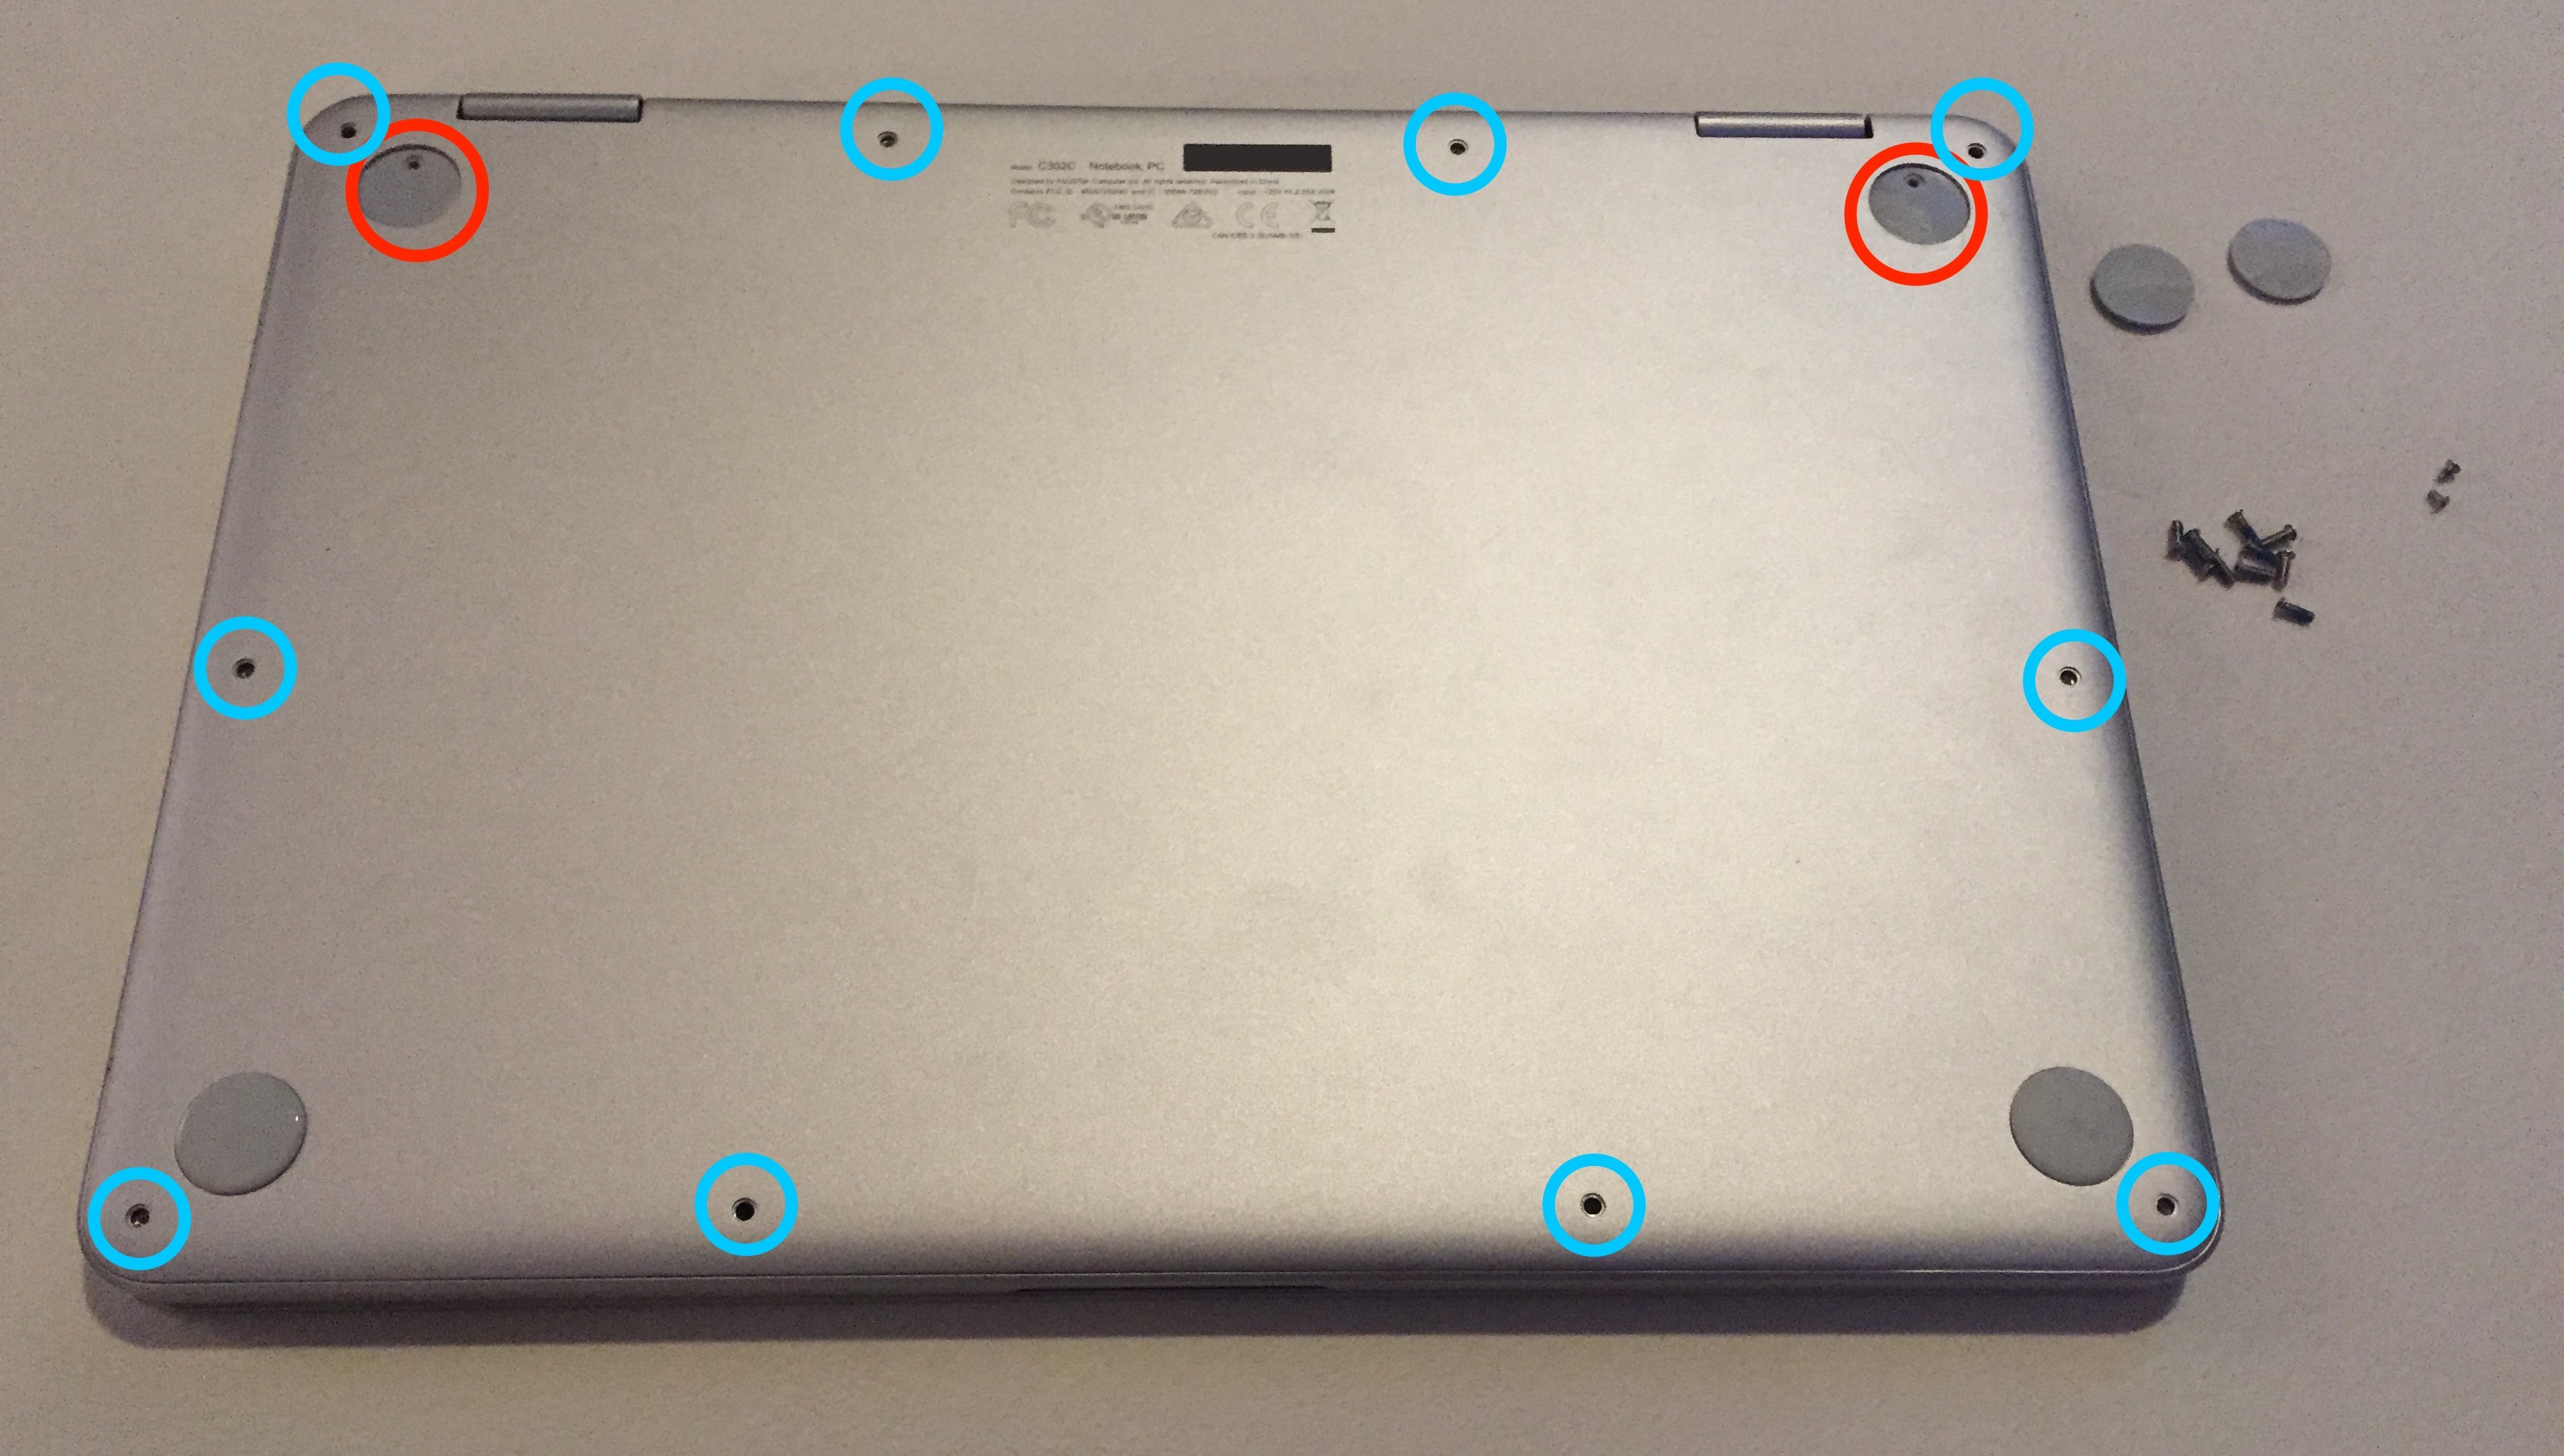
There are ten Torx T4 screws on the bottom that have to be removed, highlighted by the blue circles. Once you’ve done that, there are two more (much smaller) Philips screws hidden under the rubber feet at the back side by the hinge, highlighted by the red circles. You can carefully peel the rubber feet up with a spudger.

-
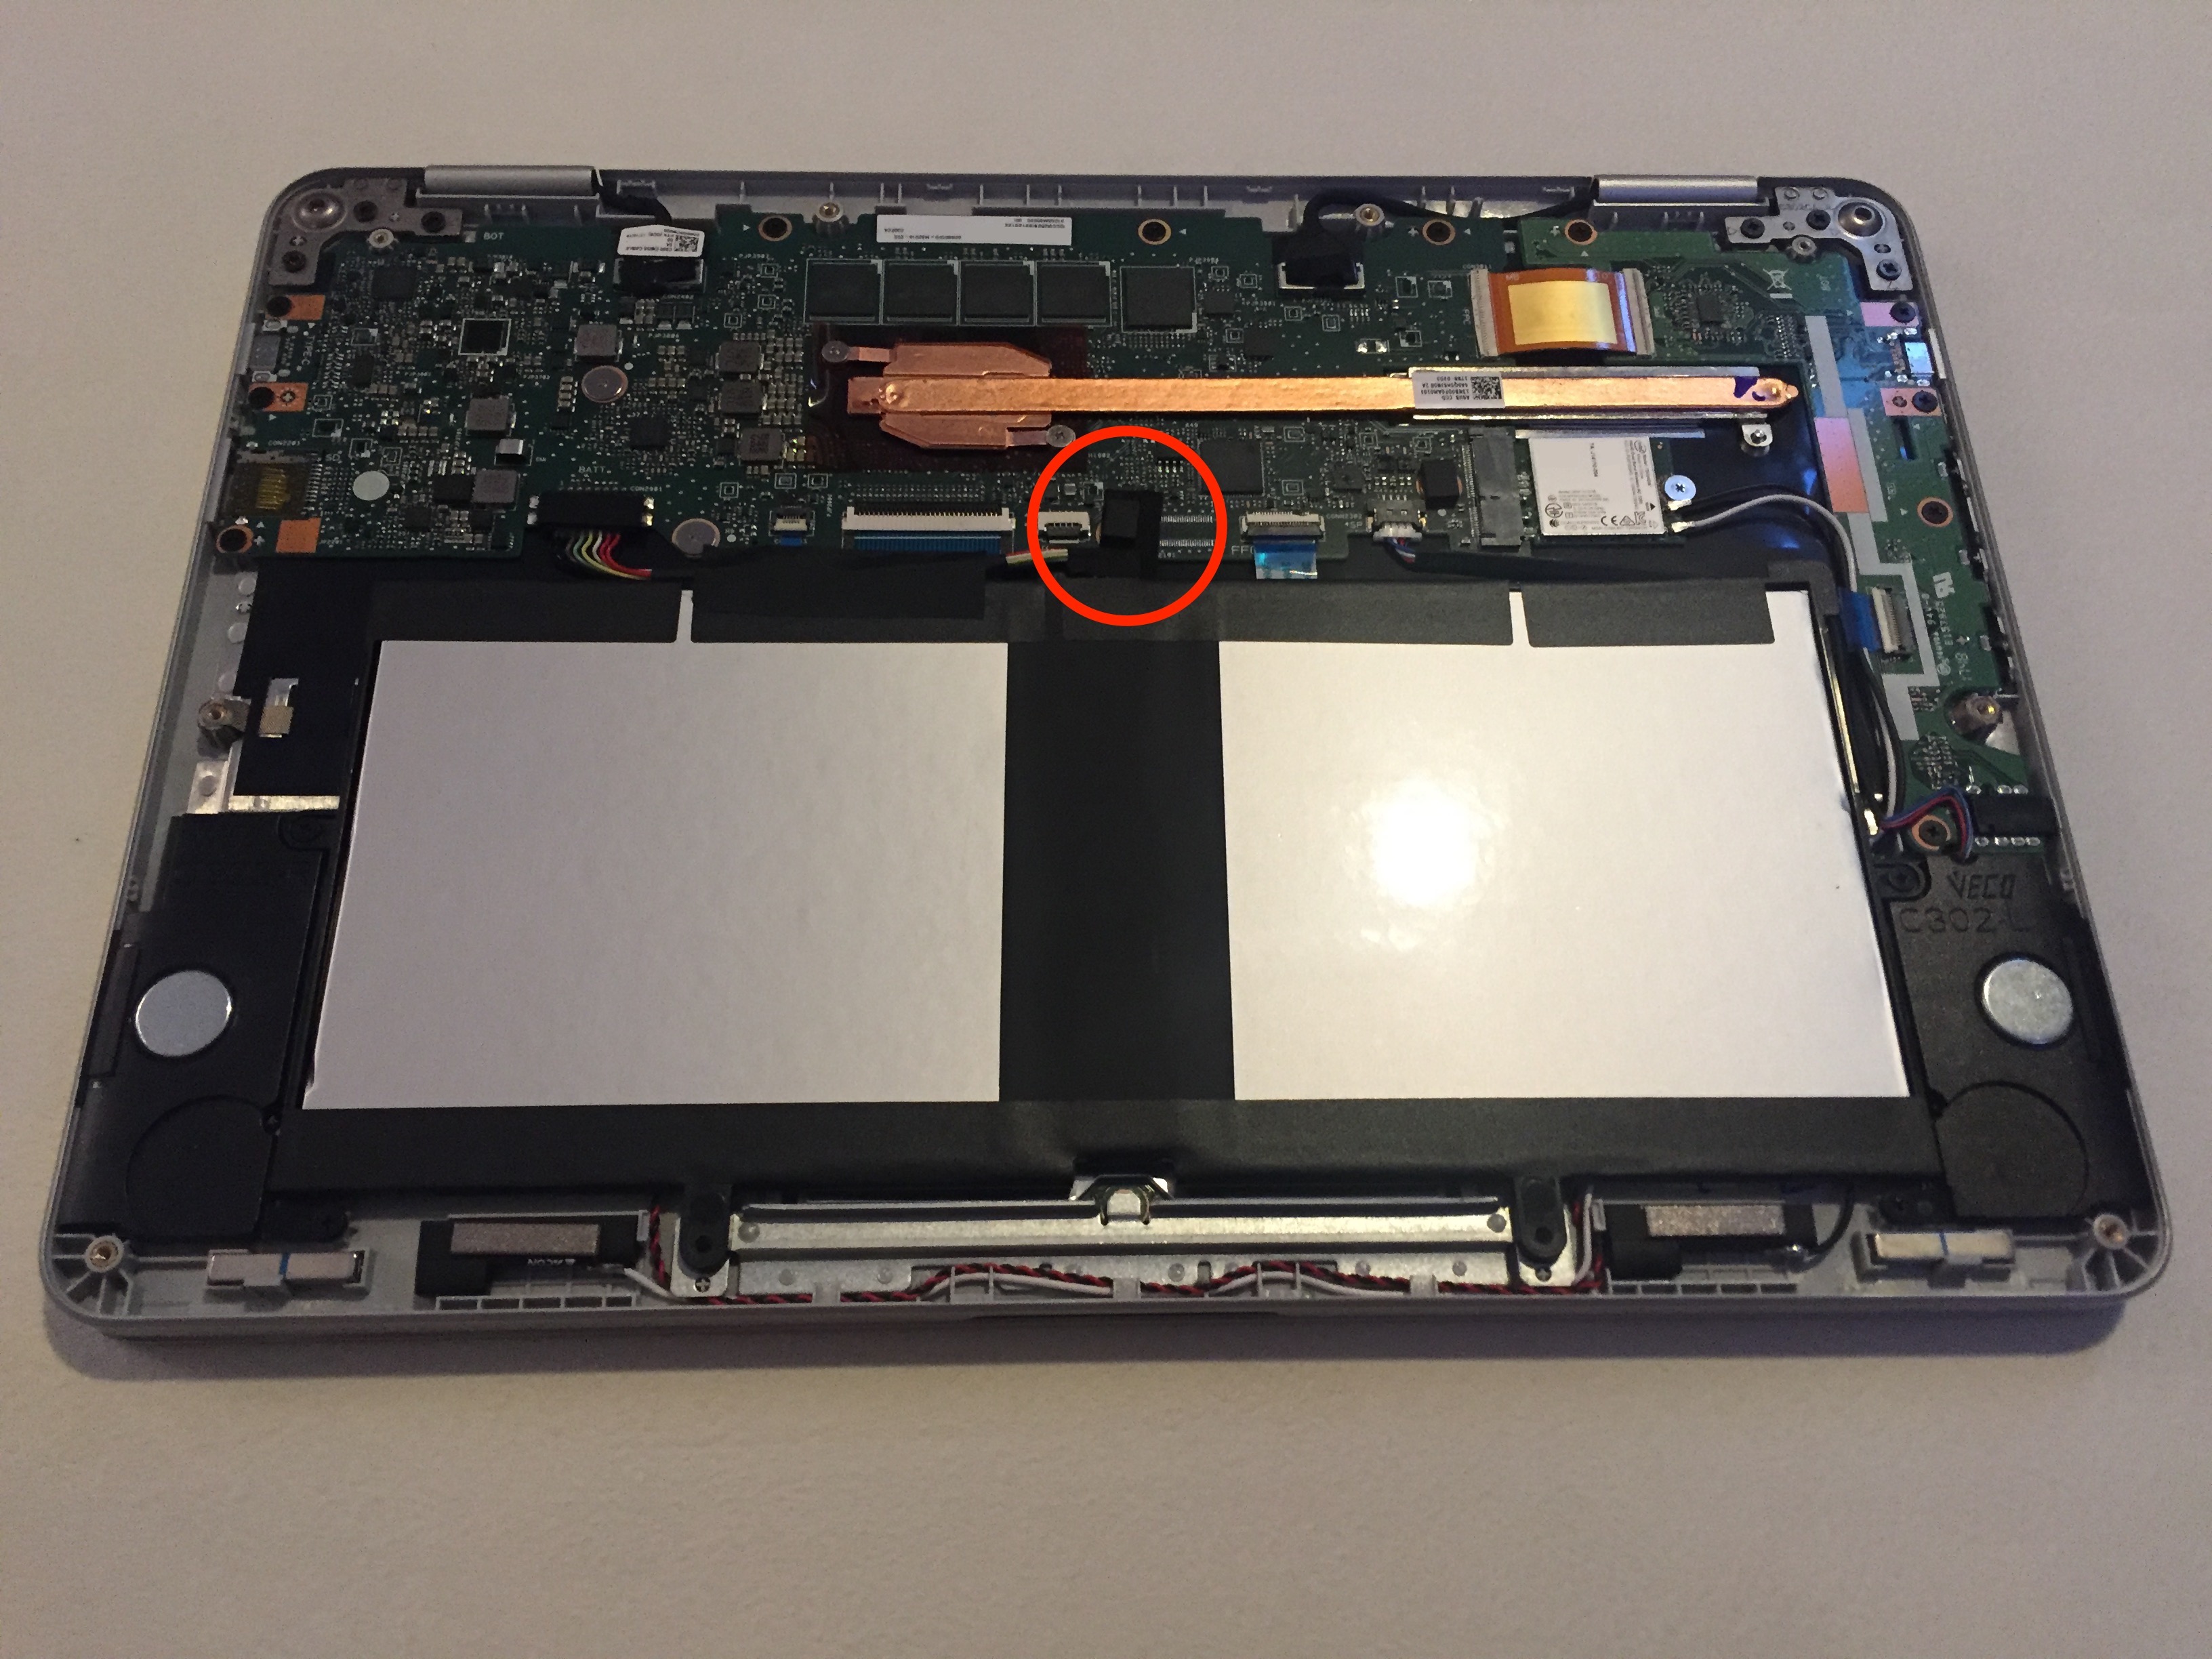
Peel back the tape.
With the motherboard at the back and the batteries at the front, you can see a giant copper heatpipe with a heatsink in the middle. If you look just down and to the right, there’s a small rubber block on top of the fabric tape. Carefully pull this tape back to reveal the screw.
-
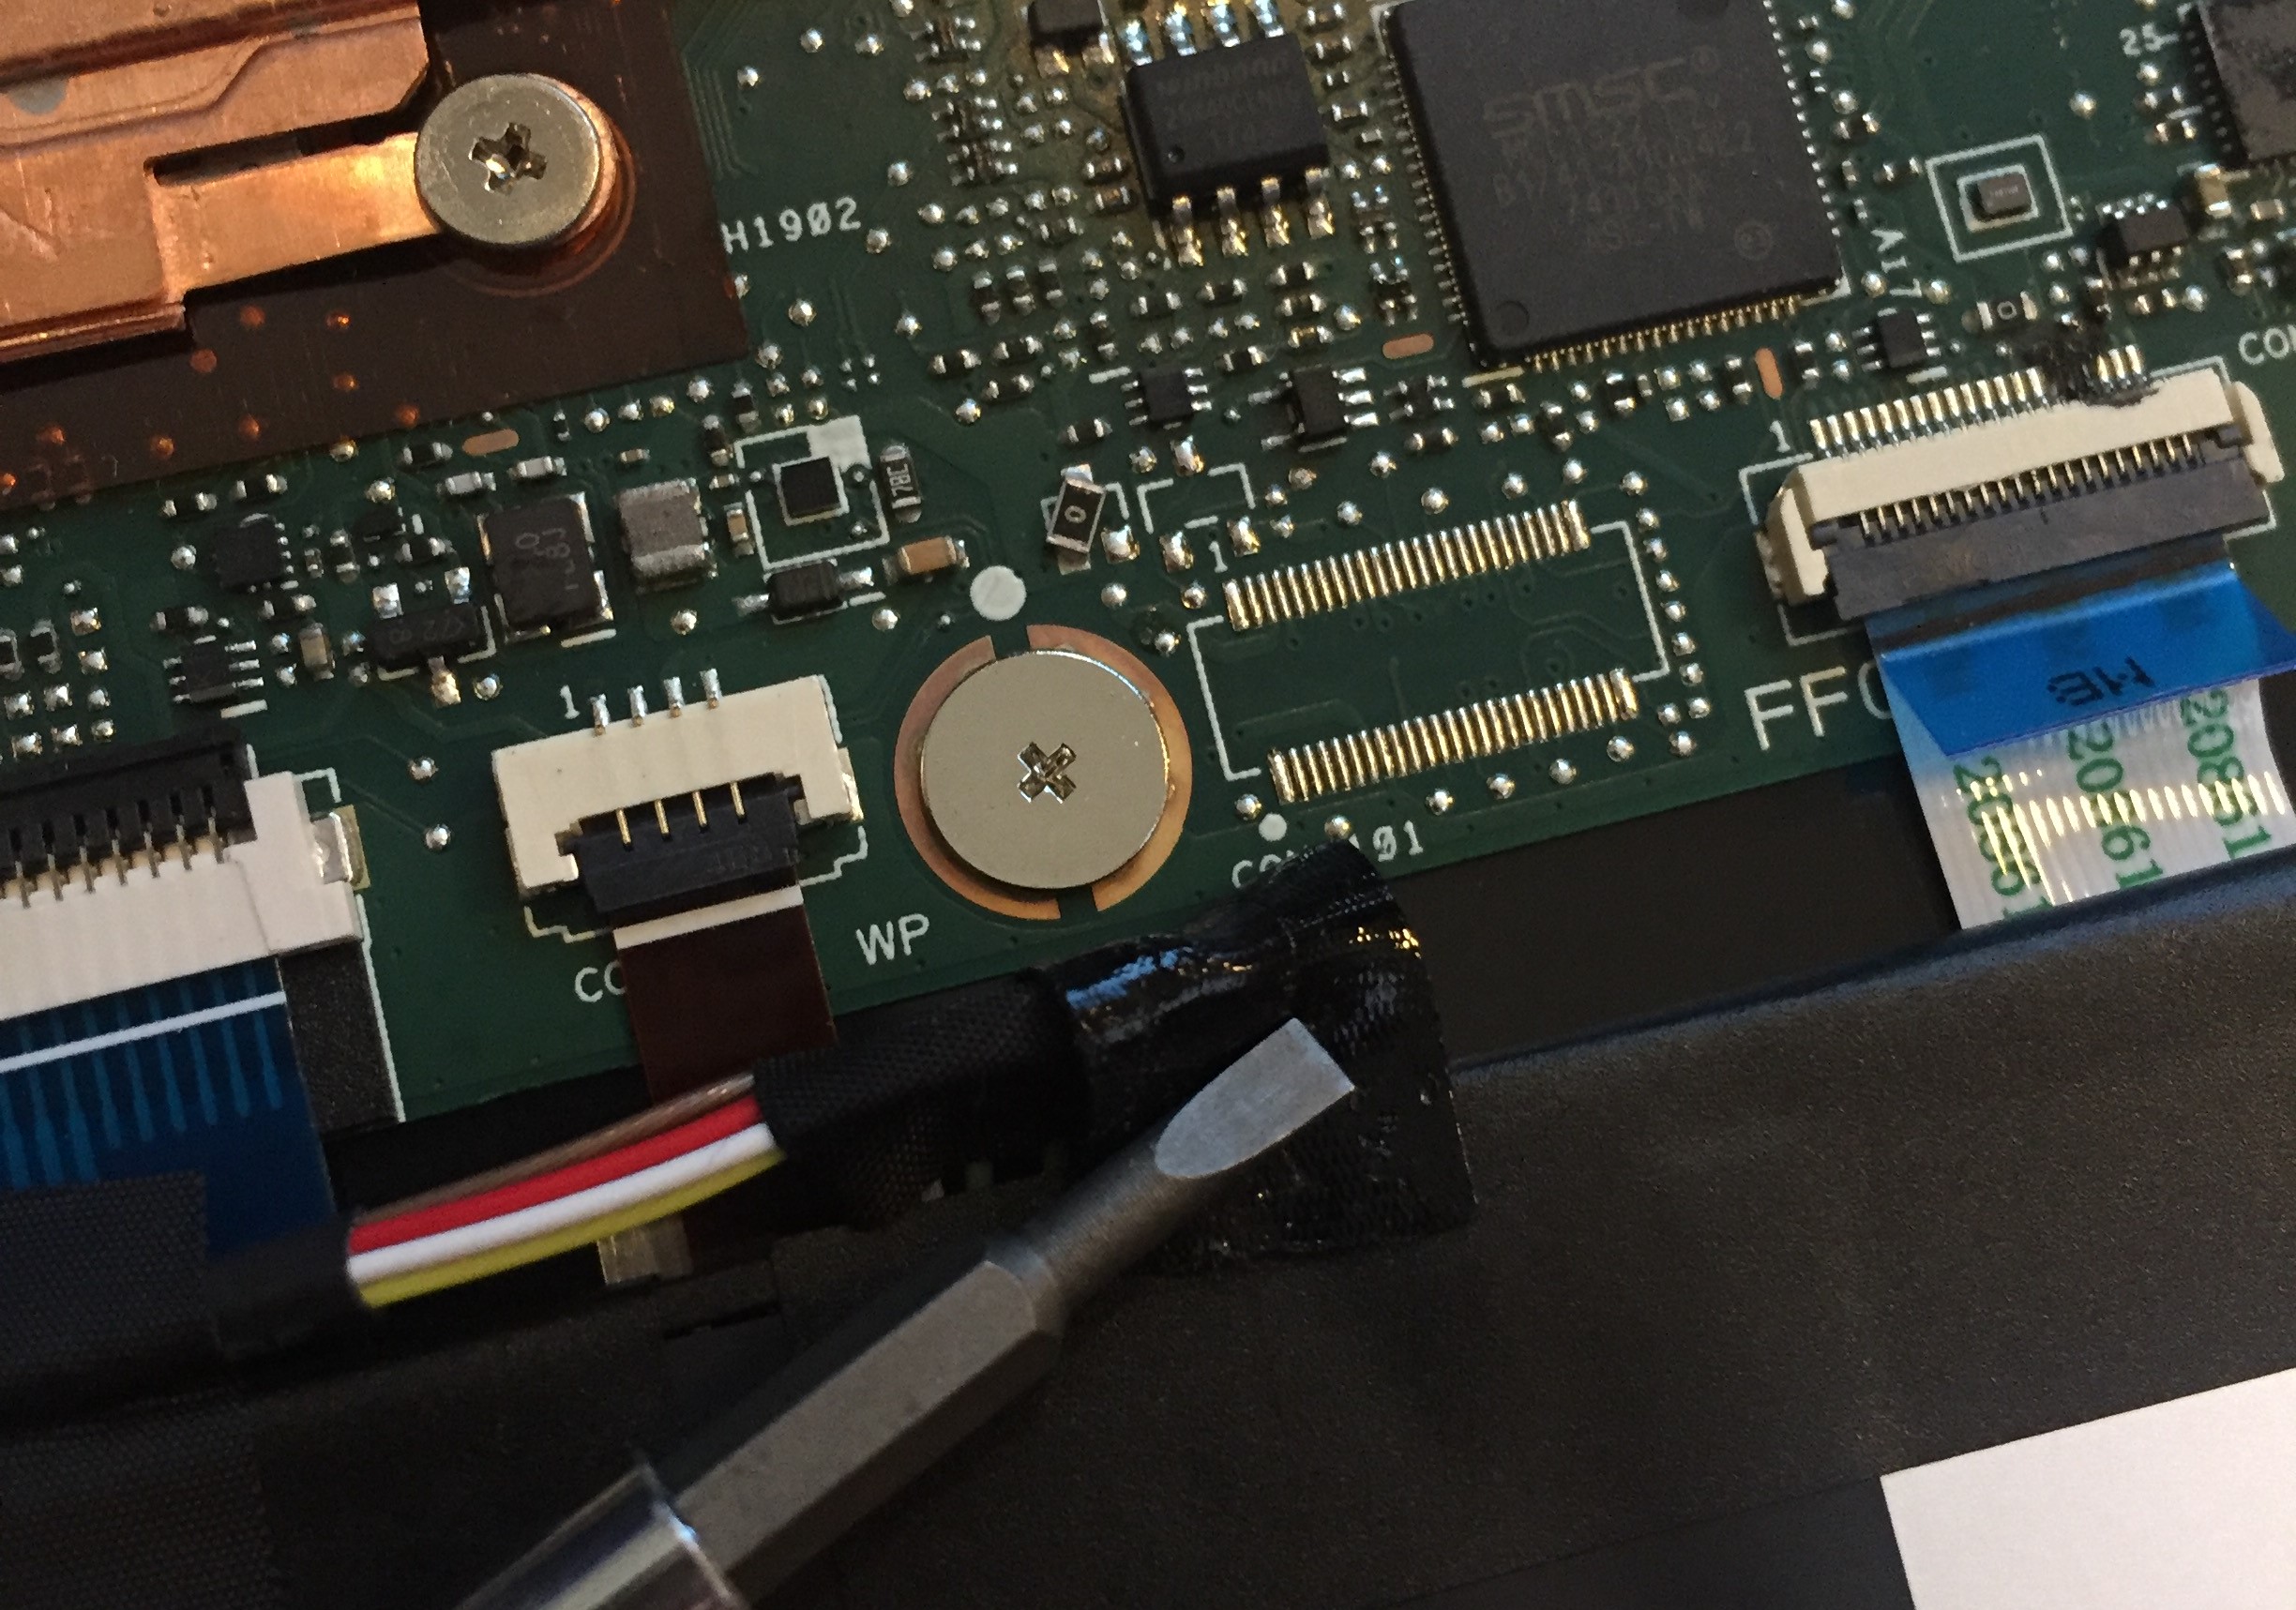
Remove the screw.
You can see a nice big Philips screw next to a label that says
WP. This is the write protect screw; remove it! You’ll note that under the screw there are two disconnected copper pads. By removing the screw, we’ve cut this particular circuit, changing the behavior of the Chromebook’s internal electronics and software.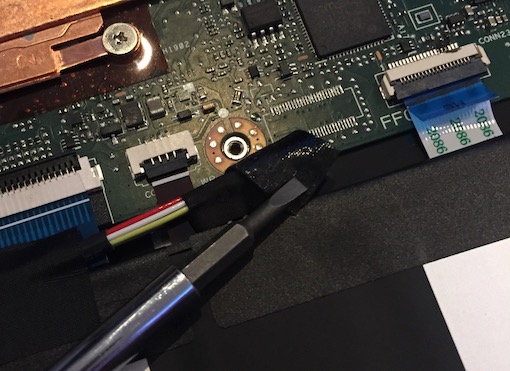

To change the settings, you’ll have to run the Chromebook with the bottom off for a little bit. It’s generally safe to just put in on a piece of cardboard or some other non-conductive material. You can also loosely fit the bottom back on and run it like that.
Changing the VPD settings
First, we have to figure out what settings (if any) are present.
root@localhost:/home/chronos/user # vpd -l
"mlb_serial_number"="QCC0..."
"customization_id"="ASUS-CAVE"
"initial_locale"="en-CA"
"initial_timezone"="America/Toronto"
"keyboard_layout"="xkb:ca:eng:eng"
"region"="ca.hybridansi"
"rlz_brand_code"="ASUL"
"serial_number"="J1N0..."
"in_accel_x_base_calibbias"="-12"
"in_accel_y_base_calibbias"="-41"
"in_accel_z_base_calibbias"="-22"
"in_accel_x_lid_calibbias"="-15"
"in_accel_y_lid_calibbias"="-20"
"in_accel_z_lid_calibbias"="-20"
"stable_device_secret_DO_NOT_SHARE"="7b99..."
root@localhost:/home/chronos/user #
On my C302, there were four: region, keyboard_layout, initial_locale, and initial_timezone. I might have been able to get away with deleting all the non-region ones, but they still seemed to have some impact despite being deprecated.
The next step is to figure out some new values for it. regions.py, from the Chrome OS source tree, has a list of all the currently supported regions. If you can read Python, it’s simple, well-documented code and you should just read it! If not:
Look for things starting with Region(. What follows will be the value for region, keyboard_layout, initial_timezone, and initial_locale.
Region(
    'us', 'xkb:us::eng', 'America/Los_Angeles', 'en-US', KML.ANSI,
    'United States'),
In this example, we’d set region=us, keyboard_layout=xkb:us::eng, initial_timezone=America/Los_Angeles, and initial_locale=en-US.
root@localhost:/home/chronos/user # vpd -s initial_locale=en-US
root@localhost:/home/chronos/user # vpd -s initial_timezone=America/Los_Angeles
root@localhost:/home/chronos/user # vpd -s keyboard_layout=xkb:us::eng
root@localhost:/home/chronos/user # vpd -s region=us
root@localhost:/home/chronos/user # vpd -l
...
"initial_locale"="en-US"
"initial_timezone"="America/Los_Angeles"
"keyboard_layout"="xkb:us::eng"
"region"="us"
...
root@localhost:/home/chronos/user #
And after running the appropriate vpd -s commands, the settings are changed! Rebooting will show if they’ve taken effect. Be sure to put the write protect screw back in and take the Chromebook out of developer mode! If you don’t, the security of your device (and data) is at risk.